Showing posts with label 3-D crafting. Show all posts

Sunday, January 17, 2010

Cupcake-Take-Along Gift Box

I made this cute Cupcake Gift box with a little pocket in the front to hold the candles. I saw this idea on Inking Idaho's blog. I've changed the dimensions a bit as the cake box was larger then what she used. Here at Becky's site were I saw it for the first time and here is the other site were I found the directions.... Inspired Papertery Ink
Contest Entered:
Incy Wincy Challenge # 25 Sweet Treats
Pink Elephant #49 Birthdays
Your Next Stamp - #7 Embossing
Charisma Cardz #2 Anything New - New cupcake stamps
Crafty Ann's #6 Embossing
Frosted Designs - Eyelet's

Here is the inside flap to hole the test tubes of sprinkles and icing powder.
I also covered the candles packaging to match with the present.

Here it is all packed up.....with a container of matching icing.

Materials Used:
Black card stock, dark purple and New Year's Eve designer paper from a old slab I bought way back.(Thought it had a great party look so I decided it was time to use up my overwhelming stash) Black ribbed ribbon and thin black silk ribbon. A purple flower with black bling in the middle. Martha Stewart lace border punch and the 2 different sizes of the Stampin' Up tag punches. The stamp Set I used was Inkadinkado's Birthday Cupcakes.....almost for I've embossed the lettering on the candles with white and water coloured the cupcakes and put a sprinkle of coloured glitter on each. The large cupcake I used
cleared glitter glue for the sprinkles.

Thanks for peeking....Anne :)

Saturday, October 17, 2009

Birthday Party Fun!!!!

This was for my daughter's 10Th birthday party today and since it being so close to Halloween I decided to make these cute coffin boxes from the Martha Stewart website. I filled them with as much candy as I could for the kids and what didn't fit I put the rest in a mummy face bag I bought a the local dollar store.The stickers on the front are the from Micheal's Craft store.
Challenges entered I know these aren't a card but they are so perfect for halloween :)
Cute Card Thursdays - Spook Fest -coffins are spooky/cute too
Pile it On - Ready for Halloween
One Stop Craft -Halloween
Creative Friday - Halloween
Stampartic -Halloween
Stampin' B's - Halloween

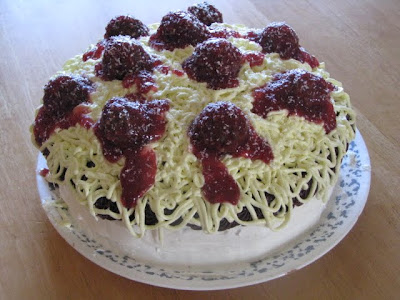
And the best part of the party was the cake..........

Spaghetti and Meatballs.

I found this in a recipe book I bought on cupcakes decorating and made a bit of a change to it by making it more or less a 9 inch cake. The kids couldn't believe it they really thought I put spaghetti on it.LOL. Oh and the great part is the meatballs are chocolate covered in strawberry jam.The cake was a hit and the party was priceless.

Thanks for peeking.
Anne :)

Last Year I made this so quick and easy too

I cut the designer paper into strips using a brad to fasten the top and bottom together. With the tiny scraps of paper I curledthe paper to make a vine effect at the top. With 3 different colours of green I used the LEAF sizzix die cut for a quick and easy way to make leaves.

Enjoy Anne

Sunday, August 16, 2009

3-D Purse Bag

Purse Goodie Bag


Challenges Entered : Simon Says Anything But a Card
Creative Inspirations Boxes and Bags

I made this cute purse as a goodie bag for my daughters birthday party. It was a bit of work to get all 7 that I needed done. I used Bristol board to make the purse and covered it with pretty pink striped for the top and flowered paper covering the bottom half. I also added some hole punched flower fastened with tiny pink brads for a bit of decoration to the front and for the handle made out of bazzil pink card stock folded 3 times over to give it some strength and over sized once again pink brads to hold it in place. We filled the purses up with make-up for each girl to enjoy. This was a great treat to give each of the girls and they were very surprised to find what was inside when they open it too.

I had used a book for the pattern but it has been along time and I can't seem to remember which one but if I remember I will post the name of it.
Enjoy :)
Hugs Anne

Thursday, August 6, 2009

Altered Shadow Box Frame

Spread your Wings!
Altered Shadow Box Frame

A close up and side view.
This is my first attempt making a dimensional
stamped image and i love the way the fairy turned out.So I also
included the bee and butterfly.
The stamp set I used is from Paper Artsy *FAIRY stamps.I made the antenna's
out of wire and the coil springs to adhere them with.

I layered many paper flowers in one corner placing metal brads in each one and added the special touch of the LOVE brad. I've used a floral paper at the top of the frame and a purple at the bottom. Also it felt like it was missing something so I added a little bling to finish it off.

Challenges Entered:
Pile It on: 3 Flowers + another Challenge
Creative Inspirations:Bling
Let's Get Shabby : Gingham and Florals
A SpoonFul of Sugar : Floral Fantasy
Flourishes Timeless Tues - Hardware (Metal)
Flutter By Wed - Butterfly Project
Hugs Anne

Thursday, March 19, 2009

Altered Shadow Box Photo Frame

Similar Box before I Altered it
Finished altered shadow box
Beaded dragonfly made by Nikki
Beaded Star made by Nikki
Finished Box

Wednesday, March 11, 2009

Halloween Pumpkin Boxes


Hall-o-ween Pumpkin Boxes


My family is always saying to me we never have enough Halloween decoration so in October of 2008, I made these cute and charming stack able pumpkins. This idea came from a magazine I saw years ago and decided finally to make them.

Materials used:
*3 different sized boxes from large to medium to small
* Bo Bunny orange paper tow sided
* deep orange bazzil textured card stock
* black and white gel pen
* scrap brown
* green textured card stock

I measured, cut and inked the paper to fit on each side and inked the edges of each box with the same colour as the paper. This is so it wasn't as noticeable to see it was just a plain box underneath. Color the face in before glueing it in place. I used the template from the magazine for their faces. I used my sizzix green leaf die and cut out as many as I wanted to layer between and 3 for the top as the box was small. I curled and bent the leafs before gluing to give it more shape to them.Used a scrap piece of brown and rolled it up to make a stem for the top of the last pumpkin then glued it in place. I can't remember which magazine if anyone knows post it below I think my hubby wanted something a little more scary then this for Halloween ........ lol...... he is just a big kid at heart.

Thanks for peeking. Anne :)